Following the articles about the making of the Jukebox, last year (cf first, second and third parts), here is a quick hardware update.
Still alive
Despite being someone roughed up by a toddler, the panda is still alive :-)
As they say in a certain cartoon series involving animals who love jumping up and down in muddy puddles: Hurray!
Sound quality issues
Over time, the sound quality, which was never Hi-Fi but still better than initially expected, started to degrade. To the point it became somewhat unbearable. My first thought was that the cheap usb sound card had an issue, but the sound was good when using headphones.
Second and third culprits were the amplifier and speakers. Plugging them on a mobile phone revealed that there was a bit of an issue but nothing very obvious.
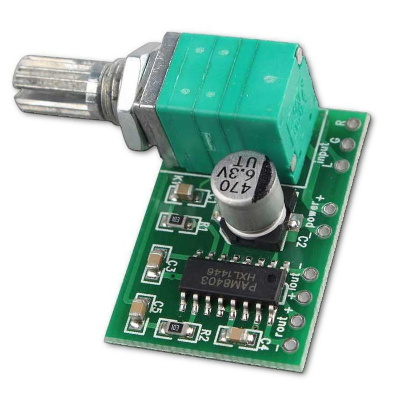
Nevertheless, I replaced the embedded amplifier with an ubiquitous PAM8403 perfectly suitable to the task. I also took the opportunity to remove the flimsy jack connector and to solder the wires directly on the USB sound card.
Sound was definitely louder and clearer. Yet the Signal/Noise Ratio wasn’t good (however it was fine a year ago) and it was a bit of a mystery. Even adding a capacitor between Vcc and Gnd on the PAM8403 board didn’t help much.
(A word of warning: on a PAM8403, like on other class-D audio amplifiers, the output grounds are floating and SHOULD NOT be connected together!!!)
Power
The Jukebox uses a powerbank to power the Raspberry Pi. The amplifier is powered via one of the usb socket. While puzzled by the problem, I tested a new setup using a second powerbank to power the amplifier... and sound became clear!
I still don’t really know what element injects some noise on the USB port (the sound card?, the Raspberry itself?, The RFID reader?...) but it has a strong effect. Probably that a capacitor somewhere has lost its mojo...
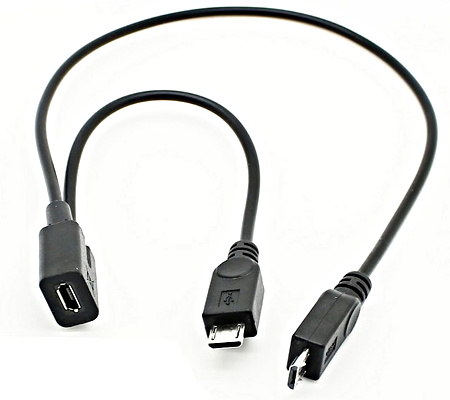
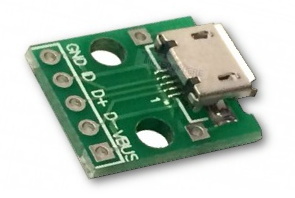
The easiest and fastest workaround was to bypass the Raspberry by using a Y splitter USB cable and a breakout board I had lying around... Sorted!
On the new setup, one power cable goes from the powerbank to the Raspberry Pi (as before) while the second one now powers directly the PAM8403 amplifier (via the breakout board).
Following the first and the second parts, it's now time to have a look at the finished product.
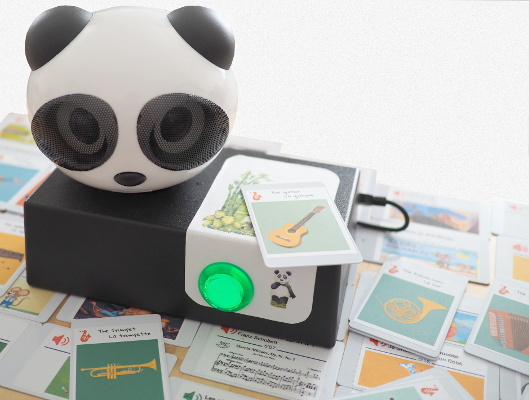
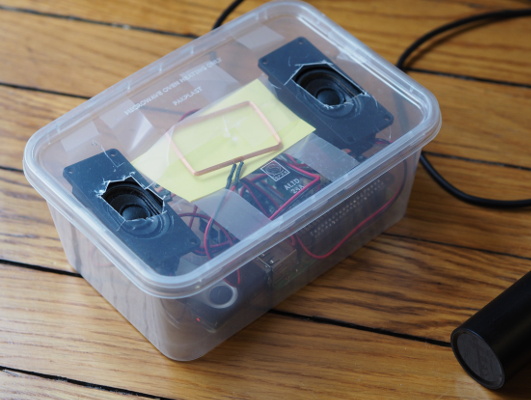
Version 1 "Panda"
This is the current version. It is based on the same big principes as the "prototype" but stronger and more stable.
The panda head was chosen only because I was looking for a cheap, ready made, ok quality, stereo, non-bluetooth USB speaker. It became the central theme of the jukebox as well as its nickname (even if in reality it's more something along " 'da "). The amplifier is in the volume control box (glued at the back) but on newer model, it seems inside the head (and the volume is controled via one ear of the panda).
The sound card is a USB generic one and it is very stable with VLC. The overall sound quality is certainly not Hi-Fi but is not shabby at all.
Components
The speakers are in the head
The amplifier is in a small box
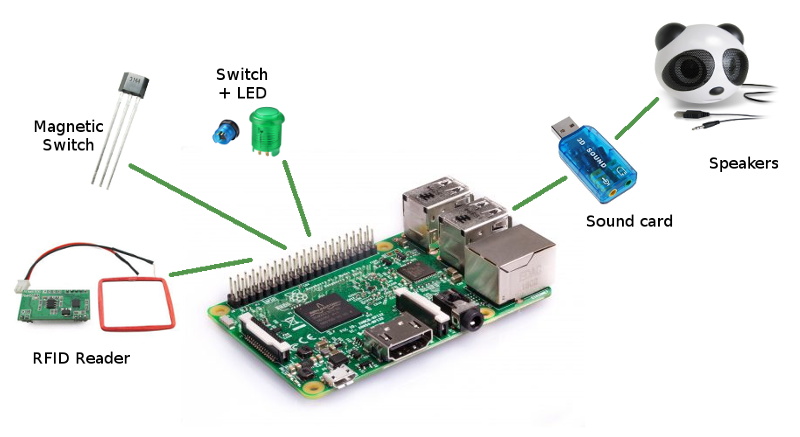
The Raspberry Pi, RFID reader & Controller, USB Soundcard, USB memory card are inside the "base"
The battery is at the back for easy replacement
Button, lights & secret switch
The green button is also a light. When pressed it pauses the music. The light is an indication of the booting process (flash), ready state (on), paused (breath), playing (off).
There is also a hall sensor inside the base (activated with a strong magnet) in order to give the possibility to boot with or without any "RF" (Wifi, ...) activated.
Code
As usual the code and schematics are available (AS IS) on github.
Following the first part, here more information about the design choices.
Cards
Depending on the frequency and the capabilities of the tag, several (physical) formats are available. For the 125kHz frequency, the non-rewritable sort seems to exist in 3 main forms:
keyring tags: possibly great for specific functions but also a potential choking hazard for young children
stickers: They seem "quite" thick (a good millimetre?) but could be attached to toys or figurines.
cards (thin or thick): thins one are cheap (about $0.10 per card), sturdy and reliable.
Labels
Wondering how to personalise the cards, in the end I went for a simple printed sticky label which can be replaced if necessary. With the A4 paper size, it is possible to find some sheets with 15 labels (70 x 50.8mm). These are slightly smaller that the cards themselves (85.6 × 53.98 mm) but near enough.
Creation
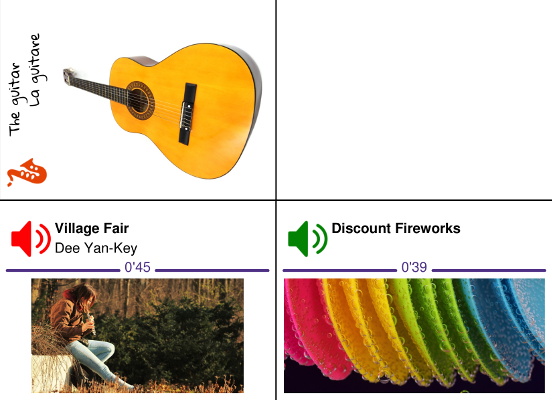
As mention before, there are several type of cards depending on the content. So far, this is mainly related to either the colour of the icon or the design of the label.
The first and main type has the following definition:
and is used for "sounds" like musical instruments or animals sounds for example.
Order of printing
The label positions are counted from the bottom-left-hand side of the page.
If it seems a bit counter intuitive at first, there are 2 good reasons for this:
The PDF coordinate system is working that way, so there is no need to swap values
When printing with an inkjet printer, it is better if the feeding of the page is starting with the thickest part (i.e. with labels still present). By printing, thus removing, labels always at the bottom, it is safer when doing it by small batches.
ID
There are two IDs at the back of each cards. But in reality, the numbers are related. I have no idea why it is organised like this but the best guess is that is related to system with 16-bit storage/computation.
The first number represents the decimal value of the complete number (24 bits). For the second group, before the comma, it's the first 8-bit decimal number and after, the 16-bit decimal remainder.
For example:
13691859 = 208 x 65536 + 60371
Note that in the YAML database, only the first number is used without the leading zeros because YAML seems to have an issue with big numbers (or might consider the value as octal rather than decimal).
The seed of the idea was a project made by someone who inserted RFID tags in CD plastic cases in order to help an elderly member of his family. I couldn't remember the reference any more but, at the time, I found the idea fantastic.
The idea here is towards a young member of the family but general logic is the same: It has to be very easy to use.
Similar projects
Similar projects which can be found on the Internet, though. For example,
There are 2 main frequencies in the world of (short range) RFID : 125kHz and 13.56Mhz, the latter being used for NFC and smartcards as well. These days, availability and price of cards/tokens/readers doesn't seem to be an issue for either type.
I ended-up going to the 125kHz route a little bit by chance:
Readers are very cheap and I had one collecting dust on my desk.
The range is slightly shorter than with higher frequencies which could be beneficial to avoid interferences between the cards.
Lower frequency might be less of a health hazard for a young child.
On the other hand, library books here and mobile phones are using the 13.56Mhz frequency. I might miss some opportunities of evolution. Who knows?
Arduino or Raspberry Pi?
After considering using an Arduino and a MP3 module, it turned out that there would be far more possibilities of evolution with a Raspberry Pi.
The main issue with Raspberry Pi/Linux is that both the card and filesystem are at risk if there are to many write IOs or the power is cut abruptly. These were mitigated using a Read-Only setup.
In term of price, a Raspberry Pi is slightly more expensive but (at the time of conception) I found some Raspberry Pi 3 for $25 delivered (from China (but UK made?)). Boot time (specially when using Python 3) is several time faster than with a Raspberry Pi B+ or zero even if these should be performing well enough.
Technical practicalities
SD Card & USB Flash
Although it is perfectly possible to store both the system and the data (music) on the same SD Card, the re-imaging of the system is a bit more complicated in this case. For the time being, I decided to keep them separate and store all the music aside on a USB Flash drive.
Boot time
A number of recipes exist to boot the system faster. It's particularly long on a old Raspberry but on a Raspberry 3, this doesn't seem to be too much of an issue (just a few seconds). So in the end, I didn't investigate much.
Read-Only
As mention earlier, the weak point on the Raspberry Pi platform is certainly the storage, specially with SD Card: They either wear quickly or end-up with a corrupted filesystem if the power is cut violently. This is a downside compare to a solution based on a Arduino for example.
In our case, it is essential to protect the card against this kind of bad treatment as one can't guarantee anything in the end of a child!
Two techniques seem to co-exist: The first one consist in using an overlay and any change will be written in RAM and lost during reboot. It as its advantages but wasn't that practical in the long run.
The second one, created, improved and popularised par K3A, Charles Hallard and Adafruit, ... has the big advantage of providing a way to switch RO to RW (and back) live, making updates very easy.
Storage of media
To keep things simple and to allow the use of the jukebox for multi-part music albums & stories, media are stored using the following structure:
1 card = 1 id = 1 album = 1 folder = 1 info file + 1 or more media files
The name of the album doesn't matter (usually something Composer-Title). A scan is ran at the start-up and the association id <-> path kept in memory.
In theory, it should be possible to read the content of a folder sorted by name, at random, etc... but so far this hasn't been implemented.
Type of cards & IDs
The info file in each folder can contain grouping tags (genre, ...) and a system of generic/group cards can be implemented (for example: "Dancing music at random" or "Lullabies" or "Bed time stories", ... This hasn't been fully implemented yet.
On the printing side of label, 2 types of cards (music / sounds) and several icons have been designed. There is currently no link with the tags cited above. More on these later.
Version 0 - Prototype
The first version created was to validated the concept. In order to keep things "easy", I decided to buy a ready made speaker solution (Adafruit I2S 3W Stereo Speaker Bonnet). The price of the bonnet + speakers + shipping (from a local reseller) ended-up in the same order of the Raspberry Pi 3 itself but it was supposed to be easier.
It turned out that VLC + Pulse Audio + "cheap" I2S is barely compatible and even after the tweaks, each song had variable level (from medium to loud) and was starting with a big plop. Usually after 2-3 songs, the whole system would crash and in need of a complete restart.
The jukebox was unstable and the packaging was ugly...
... but it was a great prototype and it was a instant hit with my little one!