I few months ago, I participated in the crowdfunding of a cheap Bluetooth Low Energy LED Bulb. Raised money was pitiful but project went ahead under a new name and I received my bulb anyway.
If you ask me, the name "Con Bulb" sounds odd both in English or in French (not for the same reasons) but this is not the point here so let's move on!
The website provides a link to apps (iOS and Android) but nothing else. These apps sort of work but since there is zero documentation, it's hard to guess what some functions/buttons are. And obviously, no info about the protocol used.
New versions of Android (>=4.4) have a nice feature called Bluetooth HCI snoop log. First, you need to activate the Developer Options by taping 7 times on Build number in your settings.
Then by activating the option "Bluetooth HCI snoop log", all the Bluetooth traffic will be recorded in a file (in /storage/emulated/0/Android/data/btsnoop_hci.log on my phone running Lollipop).
This file can then be read with Wireshark on a computer.
Decoding the data
All commands sent to the bulb follow a similar pattern:
For example here:
aa:0a:fc:3a:86:01:0b:01:08:5d:8d:0d
By matching the actions on the app to the BLE commands, I came up with a (incomplete but sufficient) list of commands.
API
Header
The header seems totally static and always
aa:0a:fc:3a:86:01
Trailer
The trailer seems totally static and always
0d
Commands
On
0a:01:01:00:28
Off
0a:01:00:01:28
White Reset
0d:06:02:80:80:80:80:80:RD:CS
White Mode - Brightness
0c:01:VV:RD:CS
Where VV = Brightness between 02 and 0b
White Mode - Colour Temperature
0e:01:VV:RD:CS
Where VV = Colour between 02 and 0b
RGB Reset
0d:06:01:80:80:80:80:80:RD:CS
RGB
0d:06:01:RR:GG:BB:80:80:RD:CS
Where RR, GG, BB are between 00 and FF
Preset/Memory mode
0b:01:MM:RD:CS
Where MM is a Preset mode:
MM=01: Red
MM=02: Green
MM=03: Blue
MM=04: Yellow
MM=05: Pink
MM=06: Cyan
MM=07: White
MM=08: Cycle of Primary Colours (Fast)
MM=09: Cycle of Primary + Secondary Colours
MM=0a: Cycle of Primary Colours (Slow)
Night Mode (Switches off after 20 minutes)
10:02:03:01:RD:CS
About RD & CS bytes
RD seems totally random
CS is apparently a checksum value equal to SUM(bytes composing the command including the random value + 0x1C) & 0xFF
For example, for preset #1 (Red) with a random value of 0x88:
gatttool -b D0:39:72:BE:12:34 --char-write-req -a 0x0021 -n aa0afc3a86010a010100280d
Python version
Using bluepy and a bit of Python, it is possible to control the light easily. Beware, the protocol is only partially implemented and communication is only unidirectional (computer to bulb) without waiting for any feedback. It might be a very bad idea to send commands at random (eg white temperature while in RGB mode) and/or too quickly.
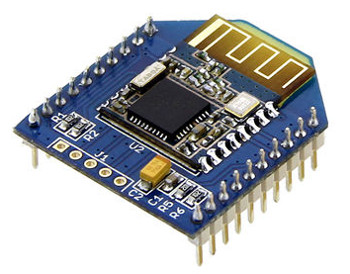
And since I also supported the airboard project, I decided to buy them in XBee format (without really knowing it, see below).
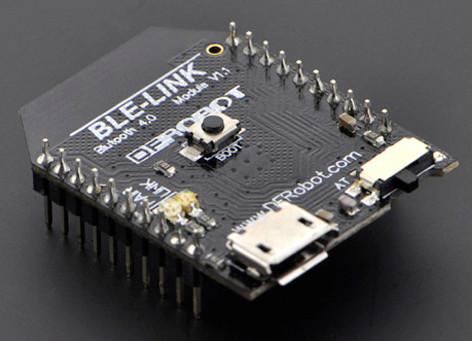
Both are based on TI chips (CC2540 for the first one et CC2541 for the second). One day I'll have to have a serious look at Nordic Semiconductor's offering (specially their new nRF51822 SoC) but the boards based on nRF8001 were out of stock anyway...
This module is the one officialy supported by the airboard. It comes with a very handy micro-usb port and integrated voltage regulator & leds. The "AT" physical switch is no longer in use with recent firmware.
I haven't explored much but, so far, I am happily surprised.
This is basically a HM-11 module with a couple of capacitors in the XBee form factor. Nothing more! Not even a "system led".
Price (even directly in China) is basically 4 times the one of the HM-11 alone and twice the one of the module above (but with fewer bells and whistles). This sounds odd but at least the embedded HM-11 seems genuine and the upgrade to the very latest firmware went without a hitch!!
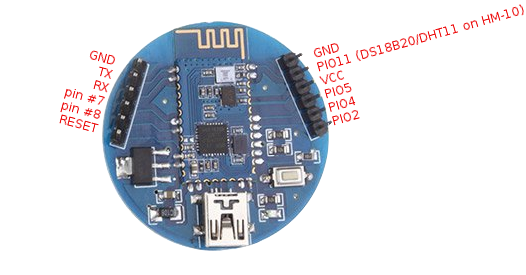
But before I reached this stage, I discovered what the "Xbee form factor" was:
As a frenchman, I am a strong Metric System Advocate as it is better on all counts. But having a module using a 2mm (instead of standard 2.54mm) spacing was annoying (that said the HM-1x modules themselves use 1.5mm) as I had to create a makeshift pin adapter to be able to connect to the module. At least, I'll know for next time!
iBeacon
Despite following all the instructions carefully, I was still unable to create a iBeacon with these modules.
Turned out that there is a bug with iOS 7.1.1 and iBeacons are not always detected. So maybe that was the signal to upgrade to iOS 8.
Using iOS 8.1.3, I was able to see the beacons... but with the HM-11 module, I had to more issues: It seems very unstable on a 3V battery (maybe a booster and/or a proper sleeping management is required) and I wasn't able to set-up the calibration value as AT+MEAS doesn't seem to work. Oh well...
One power cycle later, it got even worse because I know have only
www.jnhuama.cwww.jnhuama.cwww.jnhuama.cwww.jnhuama.c (note the missing final "n"!)
I used the correct file ("CC2540" chip and HM-10 firmware) and the upload wasn't interrupted... So what went wrong? Not a clue... I only guess that I managed to brick my $6.87 module. This time I am really starting to wonder if these HM modules were really genuine!
While I am still waiting to receive a few Bluetooth Low Energy (aka Bluetooth 4.x) tags bought on Kickstarter and Indiegogo Crowfunding platforms, I recently ordered a HM-10 and a HM-12 modules. This modules being tiny, I went for the HMSensor version of the HM-12 thinking it would be easier to use straightaway.
Having this one to work turned into A Quest with a lot of wasted time... Since it is relatively badly documented, here is some information which, I hope, could be helpful to someone else. As always, it's a lot easier when one has the right documentation!
Supplying power
This part is simple and painless. The HMSensor has:
A CR2032 battery holder
A Mini-USB socket with a 5V->3.3V regulator
A Vcc pin which can be used to feed the circuit
When the circuit is powered on, the blue LED starts to blink...
Serial connection
Thanks to the 2 TX & RX pins, using the UART/Serial connection should be very easy. The standard 9600,N,8,1 doesn't give anything, nor speeds just above (19200 or 38400 bauds). Usually when the speed is not totally correct, there is at least some garbled characters. In this case... Nothing, nada.
More about this later...
The iBeacon module from the same manufacturer mentions that AT commands can't be sent through the UART but have to be fed through a Bluetooth connection. Who knows, maybe this module was having the same behaviour?
Connection over BLE
It is worth noting here that I own an iPad 4th generation and a relatively old Android 4.1 mobile (hence without BLE).
The mobile being a no go with BLE, I tried a dozen of iOS apps to connect the iPad to the HM-12 module. The only one which seems usable for this purpose was Lightblue.
Yet, if I could see the module and establish a connection (blue light goes from blinking to steady), I was then stuck with one obscure service UUID: FFE0 and basta!
Still nothing interesting and moreover still unable to make anything of it.
Connection with standard bluetooth
The module being dual mode (i.e. Bluetooth 2.x & 4.x), I should have been able to see it under the settings panel but NO. Until I remembered that Apple is very picky about bluetooth connections and that only a few selected components are allowed to connect...
So, it was time to turn to the mobile which doesn't talk "New bluetooth" but is fluent in the "Old one": This time, I was able to see the HM-12 (by the way, it is by default advertised as "HMSoft" in both modes). After guessing the pin was "1234", connection was established promptly.
There are hundred of terminal/serial apps but again, nothing seemed to happen after the connection...
What am I doing wrong?
I scoured the web low and high, always going back to the same datasheets wh ere the HM-12 module was mentioned (in passing), pictured and where the HMSensor was described. But nothing to crack the connection challenge...
Even a documentation from a certain Tinysine HM-12 wasn't helpful as I still wasn't able to access any of the AT commands.
The Chinese company behind the HM modules has released 2 versions:
The HM-12 which is of the "standard" size of HC/HM bluetooth modules
The HM-13 which is a bit smaller
Both seems strictly identical otherwise and as I was about to give up, I searched for HM-13 instead of HM-12.
Miracle!!!!
A wiki page from Seeed-Studio gave me two clues as their "Grove - BLE (dual model) v1.0" breakout board was almost identical to my uncooperative sample!
There is light at the end of the tunnel
First, one essential indication:
Baud: 115200, N, 8, 1
No wonder I could not communicate via the serial port... the set speed (115200 bauds) being way higher than the usual (and described in other datasheets) ones (i.e. 9600 bauds).
Another thing to know is that by default:
While unconnected, the HM modules do not send any data on the serial port unless replying to a command (no greetings whatsoever). This behaviour can be modified but it explains why no data could be observed over the serial port.
Any unrecognised AT command won't produce any output (not even an error).
Commands have be be sent in one go, typing "A" then "T" won't work. The easiest way I found to overcome this is to prepare the command in a separate text editor then to send it (for example using minicom) via copy and paste.
Obviously, everything is easier with the right datasheet...
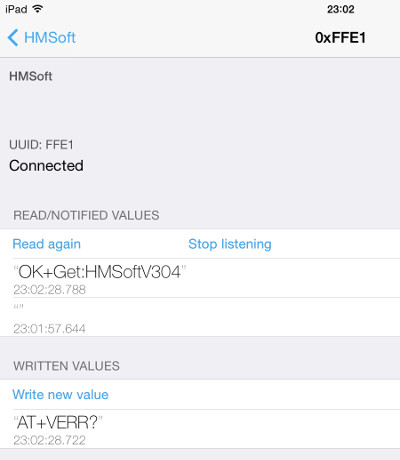
The second useful thing on the Seeed-Studio wiki page is the way to use the lightblue App as a pseudo terminal emulator. Very handy!
Still one mystery...
The HM-10 firmware seems to come in 2 flavours: HMSoft and HMSensor. No trace of a HMSensor with HM-12 on the manufacturer site so I really wonder what is going on. Moreover, it doesn't really make sense to have a Old fashion bluetooth powered by a tiny lithium battery which would not last longer than a day!
I removed the HM-12 module (and damaged it in the process) and the HMSensor board bear the mention " HM-10". Fake? Assembly mistake? No idea. In the meantime, I soldered the HM-10 and playing with it right now!