Here is some evolution about the Gas Meter 'Gazpar' for which I developped a generic battery backed-up solution.
Gazpar
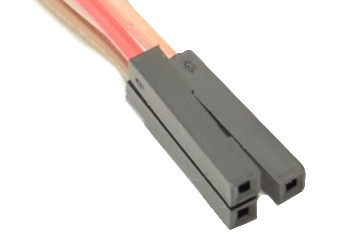
As mentionned before, the "official" cable is for sale at a hefty price (for what it is) of ~20€. I would have gone for this cable, had the meter been outdoors or in a humid room, but since it is located in my kitchen, I simply used the trick found on some forums: Female dupont wires. And it works very well indeed.
Counting
One of the main differences between the electricity and gas smart meters, is that the former will deliver all the information (including current reading) in a continuous way. In case of power cut, upgrade or crash of the microcomputer/microcontroller, nothing is really lost and things will restart as soon as possible.
The gas meter, smart or not, will only give pulses... if nobody is listening, the information is lost and the status of the reading not longer accurate.
Keeping the value
The basic idea is to decouple the counting process from the processing unit. The counting unit should not need any update or needs to restart often.
One idea was to write the current value on a flash memory but these are notoriously bad as time goes by. Wear and tear could soon be an issue.
Apprently, there is a kind of memory called Ferroelectric RAM/FRAM for which the number of write cycle is not a problem. But these are not wildly sold (but can be found as breakout board) and certainly overkill for just keeping a counter.
So in the end, the easiest solution seemed to use a basic ATtiny85 powered and keeping the value in RAM. This solution will be described in the next post.
Following the articles about the making of the Jukebox, last year (cf first, second and third parts), here is a quick hardware update.
Still alive
Despite being someone roughed up by a toddler, the panda is still alive :-)
As they say in a certain cartoon series involving animals who love jumping up and down in muddy puddles: Hurray!
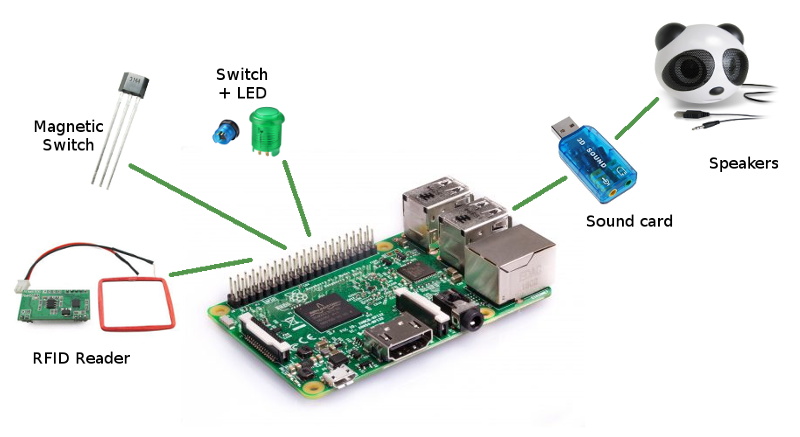
Sound quality issues
Over time, the sound quality, which was never Hi-Fi but still better than initially expected, started to degrade. To the point it became somewhat unbearable. My first thought was that the cheap usb sound card had an issue, but the sound was good when using headphones.
Second and third culprits were the amplifier and speakers. Plugging them on a mobile phone revealed that there was a bit of an issue but nothing very obvious.
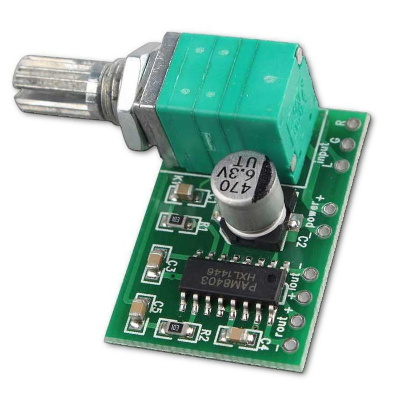
Nevertheless, I replaced the embedded amplifier with an ubiquitous PAM8403 perfectly suitable to the task. I also took the opportunity to remove the flimsy jack connector and to solder the wires directly on the USB sound card.
Sound was definitely louder and clearer. Yet the Signal/Noise Ratio wasn’t good (however it was fine a year ago) and it was a bit of a mystery. Even adding a capacitor between Vcc and Gnd on the PAM8403 board didn’t help much.
(A word of warning: on a PAM8403, like on other class-D audio amplifiers, the output grounds are floating and SHOULD NOT be connected together!!!)
Power
The Jukebox uses a powerbank to power the Raspberry Pi. The amplifier is powered via one of the usb socket. While puzzled by the problem, I tested a new setup using a second powerbank to power the amplifier... and sound became clear!
I still don’t really know what element injects some noise on the USB port (the sound card?, the Raspberry itself?, The RFID reader?...) but it has a strong effect. Probably that a capacitor somewhere has lost its mojo...
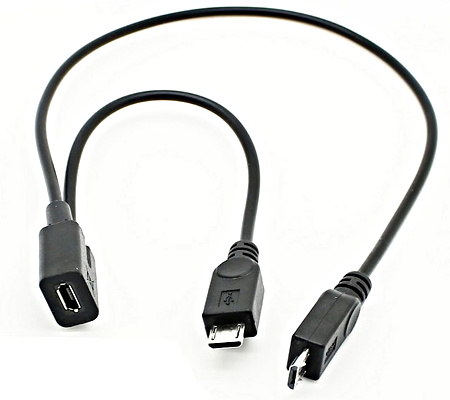
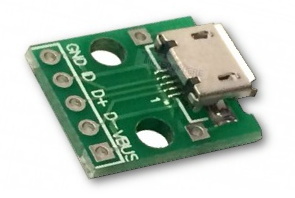
The easiest and fastest workaround was to bypass the Raspberry by using a Y splitter USB cable and a breakout board I had lying around... Sorted!
On the new setup, one power cable goes from the powerbank to the Raspberry Pi (as before) while the second one now powers directly the PAM8403 amplifier (via the breakout board).
Following the first and the second parts, it's now time to have a look at the finished product.
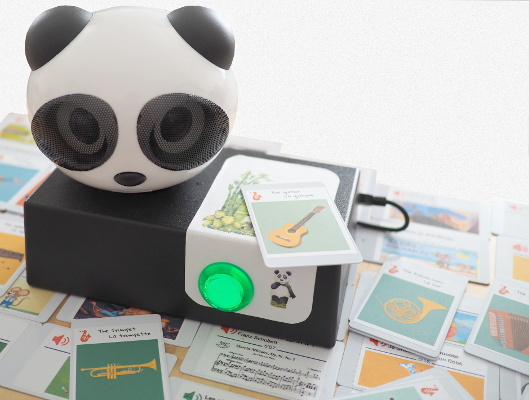
Version 1 "Panda"
This is the current version. It is based on the same big principes as the "prototype" but stronger and more stable.
The panda head was chosen only because I was looking for a cheap, ready made, ok quality, stereo, non-bluetooth USB speaker. It became the central theme of the jukebox as well as its nickname (even if in reality it's more something along " 'da "). The amplifier is in the volume control box (glued at the back) but on newer model, it seems inside the head (and the volume is controled via one ear of the panda).
The sound card is a USB generic one and it is very stable with VLC. The overall sound quality is certainly not Hi-Fi but is not shabby at all.
Components
The speakers are in the head
The amplifier is in a small box
The Raspberry Pi, RFID reader & Controller, USB Soundcard, USB memory card are inside the "base"
The battery is at the back for easy replacement
Button, lights & secret switch
The green button is also a light. When pressed it pauses the music. The light is an indication of the booting process (flash), ready state (on), paused (breath), playing (off).
There is also a hall sensor inside the base (activated with a strong magnet) in order to give the possibility to boot with or without any "RF" (Wifi, ...) activated.
Code
As usual the code and schematics are available (AS IS) on github.
Following the first part, here more information about the design choices.
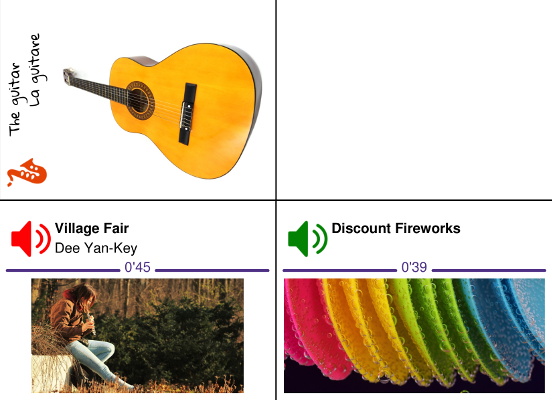
Cards
Depending on the frequency and the capabilities of the tag, several (physical) formats are available. For the 125kHz frequency, the non-rewritable sort seems to exist in 3 main forms:
keyring tags: possibly great for specific functions but also a potential choking hazard for young children
stickers: They seem "quite" thick (a good millimetre?) but could be attached to toys or figurines.
cards (thin or thick): thins one are cheap (about $0.10 per card), sturdy and reliable.
Labels
Wondering how to personalise the cards, in the end I went for a simple printed sticky label which can be replaced if necessary. With the A4 paper size, it is possible to find some sheets with 15 labels (70 x 50.8mm). These are slightly smaller that the cards themselves (85.6 × 53.98 mm) but near enough.
Creation
As mention before, there are several type of cards depending on the content. So far, this is mainly related to either the colour of the icon or the design of the label.
The first and main type has the following definition:
and is used for "sounds" like musical instruments or animals sounds for example.
Order of printing
The label positions are counted from the bottom-left-hand side of the page.
If it seems a bit counter intuitive at first, there are 2 good reasons for this:
The PDF coordinate system is working that way, so there is no need to swap values
When printing with an inkjet printer, it is better if the feeding of the page is starting with the thickest part (i.e. with labels still present). By printing, thus removing, labels always at the bottom, it is safer when doing it by small batches.
ID
There are two IDs at the back of each cards. But in reality, the numbers are related. I have no idea why it is organised like this but the best guess is that is related to system with 16-bit storage/computation.
The first number represents the decimal value of the complete number (24 bits). For the second group, before the comma, it's the first 8-bit decimal number and after, the 16-bit decimal remainder.
For example:
13691859 = 208 x 65536 + 60371
Note that in the YAML database, only the first number is used without the leading zeros because YAML seems to have an issue with big numbers (or might consider the value as octal rather than decimal).