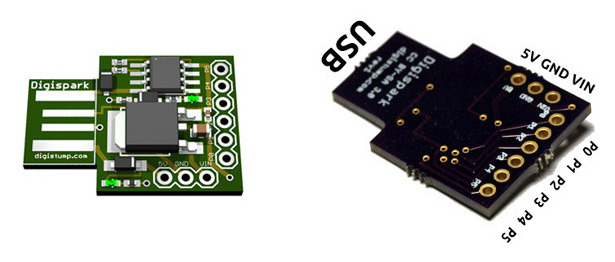
The Digispark is a Atmel Attiny85 based microcontroller development board similar to the Arduino line but cheaper and smaller. They had an extremely successful Kickstarter campaign 2 years ago and clones are available on ebay a few euros.
They seem to now have their own ecosystem and can emulate a USB device. The USB is also used to programme the microcontroller, the same way it is done on Arduino.
Wiki pages quickref and basics have some information about pins, differences from the Arduino and limitations.
Here I need only two pins for the project : 1 for the RF receiver and the other one for the serial connection to to Raspberry Pi.
I decided to go serial instead of I²C mainly because of the asynchronous nature of the signal and to avoid polling from the I²C master (Raspberry Pi in my case). Here the digispark will simply send its data as soon as it decodes something from the RF receiver.
So PIN 0 will be the RF receiver IN while PIN 2 (default for Serial Debug) will be used for the Serial Communication. 38400 bit/s seems to be the recommended value. Fair enough.
In order to allow serial communication, the serial port has to be freed from any usage as a console. Once it is done (and the Raspberry rebooted), minicom can be used to check if everything is alright.
minicom -b 38400 -o -D /dev/ttyAMA0
Note that the port is /dev/ttyAMA0 while the one for the Z-Wave static controller is /dev/ttyACM0.
Storing values
Same as the values from the airpi sensors, these ones can be stored in RRD databases:
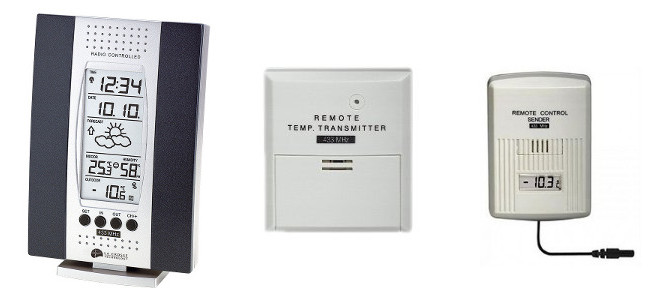
I have owned a La Crosse Weather Station WS7014 for quite a long time (I would say it is around 15 years old or so) and if one of the sensor (TX2) can't be used outdoor because it is no longer waterproof, the base station is still going strong. The newer (but at least 7 years old) sensor is a TX3-P.
Receiver
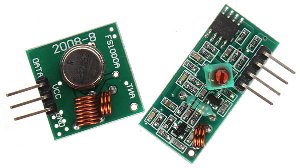
Found on ebay a 433Mhz RF transmitter and receiver kit for 1 € (inc. pp)! It turned out to be a FS1000A + XY-MK-5V.
I'm not too much bothered about the transmitter but if the receiver can do the trick (at this price), why not?
Note that some projects seem to rely heavily on Aurel's modules which are in the 30€ range.
Decoding
All these sensors communicate the 433Mhz band and it would be nice to be able to intercept the signal. Fortunately some people have already decoded it.
But after several hours, nothing was showing up on the arduino serial console.
Using the code posted on one of the messages it turned out that all the timings were off by 25-30%. Ajusting the ranges helped and some values from the nearest sensor appeared within minutes.
If the code in the PDF document (for Funksensor TFA 30.3120.90) is handly, I really think that Mr ROUBELAT is right when he considers a short pulse as bit 1 and a long one as bit 0 and not the other way around.
Another observation is that as far as I can tell the parity bit is always correct from the TX3 but not so from the TX2. So I decided not to rely on it but on the CRC and on the redundancy instead.
At night
During the day I can't receive anything from the outdoor sensor but in the evening, it appears as well. Maybe the dead cheap receiver it not completely up to task to cope with the distance and several concrete walls.
Replacing the Arduino
Due to the asynchronous nature of the transmission and on the timings (a few hundred µS), using the Raspberry Pi directly won't do. Using a full size Arduino for this is certainly a waste. Maybe a ATtiny would do but I have no experience in programming them so I went for something in the middle: A digispark.
The other possibility, still by Z-Wave>me is called the Razberry and is an add-on for the Raspberry Pi. Cool... but not really future-proof.
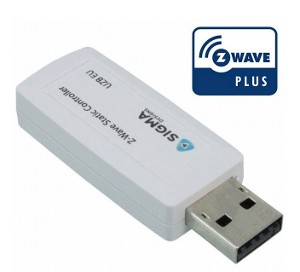
The solutions by Z-Wave>me seem to use a specific software called Z-Way and running in Javascript. Unfortunately, the documentation is very scarce and in the end I went for the Stick compatible with Z-Wave plus.
If the compilation part takes ages, it is totally painless. But all first attempts were failures and I couldn't understand what was going on... Even using the control panel. Associating 2 of the elements (Thermostat, actuator, static controller) was fine but all three together didn't work as I expected. Even following the numerous recipes found on the forums.
Then I found a way which works for me:
Reset/Exclude everything.
Include the Actuator on the Thermostat (back to the way the pack was when delivered).
Set the RaspberryPi/Stick in "ReceiveConfiguration" mode.
On the SCS317: Setup/Set up Z-Wave/Controller Shift to promote the Raspberry as the Primary Controller.
After this, the all 3 elements are connected:
Node #1: Thermostat SCS317
Node #2: Actuator SSR303
Node #3: Raspberry Pi/Stick (Primary)
Now, what can I do?
Z-Wave learning curve is rather steep and badly documented (because of the NDA).
Another particularity is that almost everything is asynchronous... and very slow. Especially when it comes to the SSC317. In order to minimise the battery usage, operation can wait for... hours!
Other example, on the Control Panel, things can take several minutes before one received a response. Not talking about the state of the network which most of the time doesn't seem to reach the "Ready" level! :-(
Frustrations
Well, the thermostat is recognised by openzwave but half the interesting functions are not (yet) implemented. It looks like if openzwave was mainly developed for switches and relays. Sadly enough, anything around the schedule commands (0x53) are not taken into account so there is, at the moment, no way to read/write the 7-day programme.
I wasn't able to read either the current temperature set point (which is odd because it should work).
After playing a bit, I decided that Z-Wave is not yet totally fonctional without a proper certified box. I'm still wondering what the implementation of Z-Way is like and if it is more advanced than openzwave.
Usages
The values I can access to are:
Status of the switch on the actuator (on/off).
Status of the thermostat (Heat/Idle). In theory the same as above.
Current temperature of the room (when changing).
Thermostat battery power
A few other random values and versions...
For the moment, I shelved idea of overriding the On/Off of the heating remotely (but this works fine). Since I want to use Python3 for the main software and this project is in Python (or C++), the simplest set-up was to have both running separately.
One process is responsible for the z-wave management. Every 5 minutes, a refresh of value is requested (will be honoured... or not) and a few second later, a JSON value file will be dumped.
The main process can then read this JSON file and do what it wants with the values (mainly sending them to RRD).
In need of a good thermostat for my boiler, I investigated about the models and technologies available.
The requirements were :
Reliable & Safe (I don't think it's a 230V commutation (more around 24V) but still...)
Voltage-free contacts
Programmable over 7-day
At least 4 settings per day (on/off morning + on/off evening)
Programming times with 1/2 hour steps max
Wireless if possible
Autonomous (no obligation for the Raspberry Pi or any other micirocontroller to be on)
Connectable to a home automation system if possible
Remotely programmable if possible
Remote override of settings if possible
Trouble is, the perfect thermostat doesn't seem to be available in France. During my investigations, I found the following options :
Wired option: Cheap but not wireless and not connectable to an external system
Proprietary wireless: Usually not connectable either
Wifi thermostats - local server: The best (on the paper) seems the one from Heatmiser but they can be quite expensive, need permanent 230V and are wall mounted. Moreover they don't seem to be distributed in France. But the API is documented.
Wifi thermostats - cloud: The latest trend: Nest, Tado°, Netatmo, etc... I DON'T want to rely on a internet connexion to command the heating nor I want to upload private data (being in or out) to a private company. Privacy and risk of ending up with a useless piece of hardware if the manufacturer disappears render this solution a no go.
Chacon/DI.O/MyFOX: Didn't find anything available
EnOcean: Didn't find anything available/suitable
Z-Wave: Horstmann/Secure seem to fulfill the requirement
Secure SCS317
Horstmann (the old brand name) seem to appear on all the home automation forum, especially the model HRT4-ZW. Secure (the new name) released recently a model SCS317 (sold as kit paired with the actuator SSR303 under the name SCS318) which is ticking almost all the boxes of my list.
It is a 7 day programmable thermostat with 6 temperatures settings per day, temporary override, holiday mode, TPI (Time Proportional & Integral) and speaks z-Wave.
It also has a ten-minute resolution, so I could programme some heating from 06:40 to 8:20! My old thermostat could only do hours (for example from 07:00 to 8:00).
Z-Wave
The main feature is the fact that it is a Z-Wave product so (in theory) compatible with loads of other products and Home Automation boxes. That said, Z-Wave is also very much a proprietary wireless technology (even the access to the API is under NDA!!!!) and seems quite complicated to control from homemade solution. But this will be for next time...