Having started with pollution sensors which turned out to be almost unusable because of the lack of calibration and because I live in Paris which can sometimes have Air Crisis I wanted to carry on with new sensors.
Trouble is, most of them tend to be very expensive or uncalibrated (and sometimes both!).
I was in particular interested in particle sensors (like PPD42NS, PM2.5 laser dust sensor, ...) and CO2 sensors. Each were, at the end of 2015, around $50.
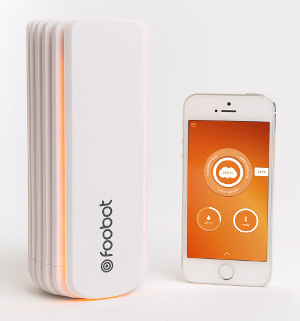
Alima & Foobot
I was aware of the Alima prototype which evolved to become Foobot (honestly how did they come with this crazy name? Sounds really like foobar)
They had a successful campaign on Indiegogo (Indiegogo sounds crazy in French too since gogo means dupe/naive person. That said maybe it is appropriate to crowdfunding after all!).
There are not cheap but they measure (according to the specifications):
VOC: total Volatile Organic Compounds, including gases such as Formaldehyde, Benzene, Toluene, Ethylene glycol, etc.)
PM: Particulate Matter (PM2.5)
CO2: Carbon Dioxide
CO: Carbon Monoxide
T: Temperature
H: Humidity
And once you add the price of all the sensors and components, maybe having a calibrated system with apps and support for $199 is worth it.
Cloud business
The main problem with this kind of gadgets/toys/appliances/things is that they rely on the "Cloud" which mean that they are basically dead the day the company shuts down or decides they want to "refocus". There are countless examples of these, a very famous one being the Nabaztag/Karotz.
There is also the danger of data traveling to US or China without knowledge of what is done with it. At least foobot is based in Europe (Luxembourg) so I assume EU related privacy laws apply.
Openness?
I also discovered that there were some info/code published about their prototype, renamed airboxlab so I would hope that in case of problem the foobot could be updated to talk to a private server.
Installation
With all this in mind, I took the plunge and ordered one. The installation can be done in minutes (as long as you have a phone/tablet on the same Wifi Network and that your Wifi SSID is visible).
At first the application wasn't neither intuive nor reliable. Newest version seem stable and easy to use.
It takes about a week for the Foobot to settle. At first I thought it was busted because all readings were bizarre but after a while they started to make sense.
Notifications
At the begining, I had the notifications on but after a while they become quite annoying and frankly there is not much you can do if the air is not good in the middle of the night! You can also tell the system what the event was but honnestly I don't understand how that works.
Note that you also receive reports by email on a regular basis.
API
There is a API (via the Cloud, unfortunately not a direct connection to the appliance) with historical data.
It can be called up to 200 times (odd number even if mathematically even) so I download latest data every 15 minutes (96 times a day).
The API has been pretty stable/reliable so far.
Sensors
The Good?
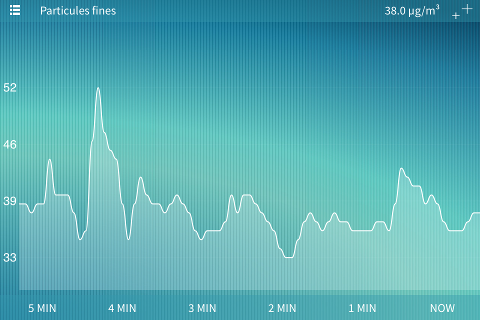
The sensors "don't like" cooking (or maybe cooking = polluting?). A few month ago, we made some crêpes and the Foobot became all orange (= bad atmosphere). Graphs when to the roof! It is about the same if the oven is turn on.
I assume anything with oil will create loads of "particulate matters"... At least that what the readings say!
The less good
Looking at the component list of the Airboxlab or at the current datasheet, there is something bizarre.
Yes! There is no proper CO2 sensor! The MQ135 is a generic Air Quality Sensor and it is the one used for the Volatile Organic Compounds.
And because of this, the graphs for VOC and CO2 have exactly the same shape and it impossible to say if CO2 or Non-CO2 VOC are the ones triggering the sensor :-(
This wasn't clearly advertised when I bought it and this is a bit of a disappointment.
For CO, it is not even returned by the API. That said the Foobot is not an Carbon Monoxide detector and there should not be much CO around in a room so I am OK with that one.
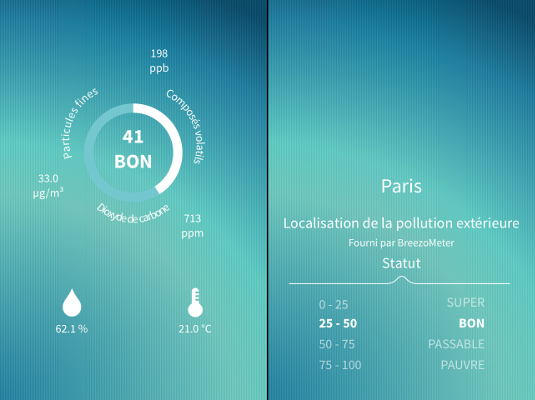
IAQ
Calculated value
Foobot computes an Index which represents the Air Quality (Indoor air quality (IAQ). The lower the better. The colours (shades of blue & orange varies according to this index).
Breezometer
They recently added a outdoor value. Data is computed by Breezometer (how? who knows) and the result is shown on the app. Data is also available directy from Breezometer but there is a small catch:
Breezometer index via Foobot API is also the lower the better (to keep data consistant)
Breezometer native index is the higher the better!
Conclusion
First, it works! Seems a bit bizarre said like this but I came across so many dysfunctional stuff that it is worth mentioning that this simple fact.
It measures values which seems in line with my other sensors (Temperature/Humidity) and activities (PM/VOC) even if I can't compare how well calibrated they are.
API is rather stable. The App (IOS/iPhone version but used on an iPad) a bit less depending on releases.
So as I pure sensor, I believe it can be recommended.
I am far more skeptical about the "better air" all the marketing, blog and website seem to be based on. OK knowledge is the be first step towards improvement but I still haven't understood "the magic" about "Predictive data [and] how Foobot learns about your habits and is able to detect pollution peaks before they actually happen".
Apart from opening the window (or stop breething), there is little which can be done in case of pollution alert!
Last summer, I hinted that I was about to switch from the monolithic programme with all its threads to a constellation of separate processes.
The main reason was that the monolithic application needs a restart for any change in the configuration and that a crash/exception on one thread breaks everything.
True, having several separate processes impose to find a way to start them all in the first place and something else to look after them. It also uses quite a bit of memory (because of Python overhead, a tiny process is almost as memory hungry as a small one). Last but not least, the interprocess communication can be problematic.
Enters the Raspberry Pi 2
Fortunately, the Raspberry Pi Foundation released the Raspberry Pi 2 which has now a quad-core CPU, 1GB of memory (and even the Raspberry Pi 3, more recently, but I doubt it would make much difference here). At ~ 3MB of memory per process, there is plenty of available RAM! And also, starting a Python process is now almost immediate compared to the 5-10 seconds needed on the 1-B+ model.
Communication : MQTT
Thinking about it, there is not much need of communication between processes. In the majority of cases, it is all bout sending the data to the display interfaces and to a database (for the sensor part).
Note that so far, I have very little automation (besides a couple of sockets).
Anyway, the ubiquitous MQTT can solve all the communication problems... These days, it seems that there isn't a similar hub project around which isn't using MQTT either at the core or at least for plug-ins communication.
I have already detailed the way I format the topic and the payload of the messages.
Every process is now using a bootstrap library which manages the daemonisation, the MQTT communication, and logs. There are 2 types of messages : the data and metadata (starting, heartbeat, ...).
Current state
Currently the model used is the following:
Notes :
All measurements have the MQTT retain option activated to keep the last value available to a reconnecting process
Pushover is a notification system for mobiles (and desktop)
I am currently using 2 storage systems: RRD and a timeseries database (test in progress)
'display_bikes' and 'display_transport' call external webservices and/or doing web scraping of pages. Resulting data is only displayed but never stored.
As mentioned previously, the kit I bought has 2 sockets. But knowing that the remote can control 4 (it has a total of 8 buttons), it would be good to be able to use the remaining unused buttons. And why not, since the state of the socket can't be retrieved, to intercept and store the current state.
Maybe there is a way to squeeze yet another protocol?
It turned out that it was quite easy to do without much interference to the existing two decoding pipelines!
Meet the 433Mhz receiver
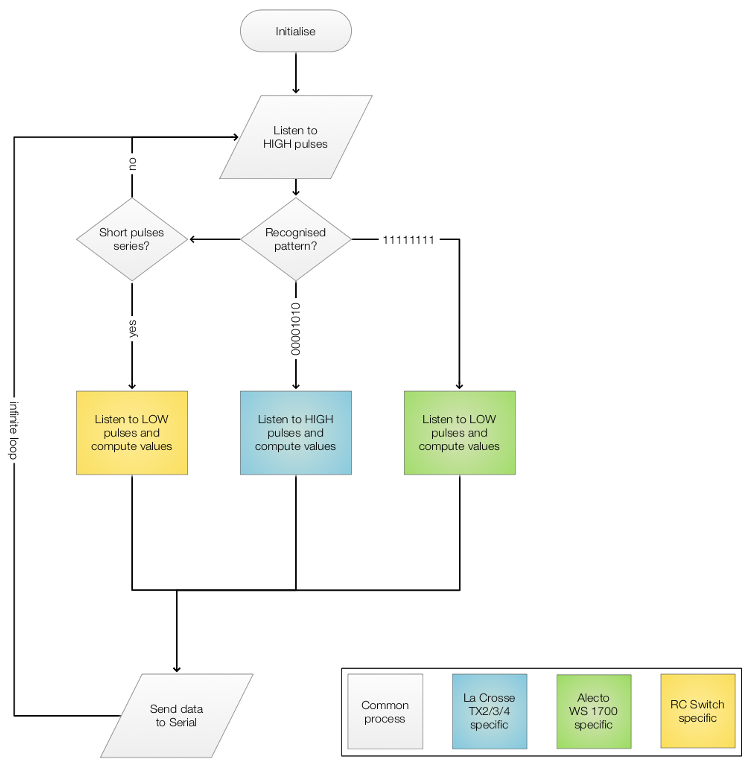
Basically, the signal from the remote will appear as a series of High pulses which are shorter (~ 320µS & ~ 960µS) compared to the one from the sensors (~ 500µS/1300µS and 1900µS/3800µS). If a string of these specific pulses is detected, then we switch to the remote decoder.
The signal being sent at least 3 times from the remote, this mean that we can intercept the second or the third transmission. The transmission itself starts with a "very long" pulse (31 times the base pulse). The encoding is based on a tri-state system which basically means, since we can ignore the floating state, that every other bit must always be a 1. The data consists in the address part, the button part and the state (ON/OFF) repeated but inversed.
For example:
101011101011101010101110
can be decoded in (checking then removing all the odd bits):
001001000010
and interpreted as:
address (DIP switches): off-off-on-off-off
button: A
Action: On
Code
Since there is now a little bit more than Lacrosse sensor decoding, I renamed the project on GitHub to 433Mhz receiver...
Since I embraced the MQTT protocol, I added the conversion and now any touch on the remote control is translated into something like (to carry on with the example above):
Topic: cm/remote-00100/action/a
Payload: {"ts": 1451215192, "value": "on"}
The first part is complete. Hooking up a 433 Mhz emitter (remember this?) on the Raspberry Pi is easy but for both technical and whimsical reasons, I have something else in mind...
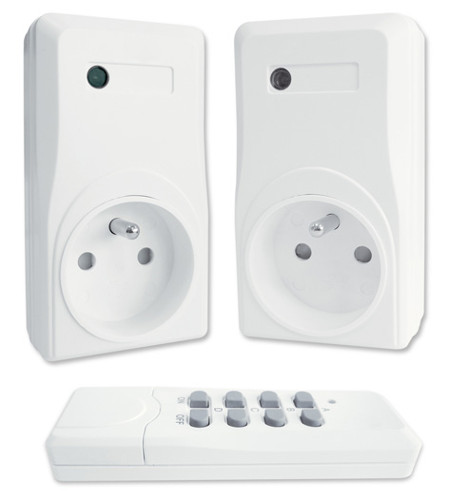
A few days ago, as I was in a nearby DIY store (looking for something I didn't find in the end), I came by the Electricity aisle and noticed cheap remote sockets. These are a not new thing, I owned some more than 25 years ago — so unstable there were switching on and off randomly — and in France at least, the Belgian company Chacon made a successful product (DI.O) with this kind if items.
One of the major issue with them is that they are without any feedback of the status like you could have on a modern "smart plug". Yet, where a Z-wave socket alone is at least 40€, here a pack of 2 sockets was less than 15€ including the remote and its battery. The "manual" includes a EC Declation of Confirmity so I assume there are safe to use. The power is limited to 1000W but for Christmas lights, this is not an issue!
Obviously, the idea was also the do the reverse engineering on the protocol and if possible try to emulate the remote itself like I did several times in the past. Turns out that this very model of remote is used in dozens of packs and the circuit inside is well known and even officially documented!
Protocol and Home Automation
A quick search show pages and pages on the subject. These one are now called "Smart Home" but were previously sold under the Phenix brand by IDK. Protocol seems virtually identical to the Elro Home Easy plugs.
The next question was: What is the best to integrate these elements in the existing installation? There are two main parts for this: controlling the sockets but also making the most of the remote (especially the two unused ON/OFF buttons).