One of the humidity sensor currently in use, on the Home Automation Project, is the ubiquitous DHT22 also known as AM2302 which came with the AirPi board I installed.
I don't particularly like it as it has a very specific protocol which need a special C-compiled software to communicate. Second problem, it sometimes crashes. And lastly, I am starting to have serious doubts about its accuracy (specially on the humidity side).
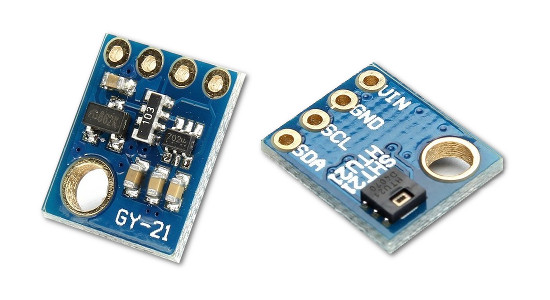
I discovered an alternative known as SHT21 or HTU21D (depending on the manufacturer) which seems quite appealing as this one use the perfectly standard I²C protocol.
That said, the chip is so tiny, the only way to use it is mounted on a breakout board (like the GY-21): For around 4€, you get the sensor, the power regulator as well as a level shifter. Which means that it can safely be used with 3.3V or 5V.
More information and datasheets
Datasheets and examples in C can be found on the manufacturers' websites:
Basically, it works by sending a Read (humidity or temperature) command, wait (hold mode) or poll (no hold mode) for the answer and apply a mathematical formula to get the actual value.
There is a precision setting but the only effect is to reduce the measurement time and since on the default/highest setting it takes less than 50 ms, there is little need to change it.
Using it with Arduino
As I wanted to experiment with the ESP8266, I (temporarily) diverted the chip from its initial goal (i.e. replacing the DHT22) and decided to use it on the Arduino plateform. There are librairies available from Adafruit or Sparkfun but I created my own version to include soft reset as well as serial number reading.
I'll publish it as an example at some point in the future.
Later, using this chip on the Rasberry Pi with python should be trivial.
First impressions
So far, the only small drawback I found with this kind of chip is the fixed I²C address (0x40) which mean there can only be one sensor per bus. But in practice, there is little need for more than one anyway.
When a Raspberry Pi -- which doesn't have a hardware clock -- boots, the time can be set thanks to NTP. It usually works well enough to be totally transparent.
Trouble usually starts if there is a power cut. By the time the Raspberry is up and running, the modem-router is usually still booting/synchronising with the ISP and no clock is set. Programmes start using the Epoch, i.e. 1st of January 1970!
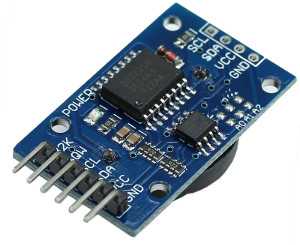
The best hardware workaround is certainly to use an external clock like "real" computers. Maxim's DS1307 has been a reference for years but is both 5V and not reputed for its accuracy.
Raspberry Pi's I²C being in 3.3V, I tried to use a cheap RTC Clock using a DS3231 also from Maxim.
There are loads of webpages explaining how to setup Linux to use this hardware clock and if at first everything worked fine, I then started to notice some problems.
Symptoms
With Raspbian, the main problem was that after a while, I couldn't SSH to the server anymore. The Raspberry being headless, it wasn't easy to guess what was going on but it turned out this behaviour was the result of the disappearance of the root directory.
And this was itself caused by an I/O error on the SD Card. It seems that the 2 main reasons for this to happen are:
Problem with the power supply
Faulty (or incompatible) SD Card
The power supply was bought from RS with the first Raspberry and is rated 1.5A. Swapping with the second one (from Farnell this time) rated 2A didn't change anything. I then decided to use the other SD Card with a brand new Arch Linux on it.
At first, no failure but then 2 problems also showed up:
Loads of log lines related to mmcblk or
An extremely slow Raspberry Pi with an non-explicable high load (~ 6)
Solution?
I was a bit lost but I found a forum message which gave me a very important clue:
Second: disconnected the Dallas RTC DS3231, as it was pulling the 3.3v line too low, along with the DHT22 sensor.
Another test
Since I use a Level Shifter (3.3V/5V) on the I²C bus, it was very easy to move the DS3231 IC to the 5V side and try this theory. Unfortunately, this didn't make any difference.
Since I removed the module, the Raspberry Pi is no longer slow and load is now ~0.05.
Software workaround
With Arch Linux, I now force the application to start only when the network setup has completed (this includes proper NTP initialisation) by adding in the [Unit] section the following lines: