As mentioned previously, the kit I bought has 2 sockets. But knowing that the remote can control 4 (it has a total of 8 buttons), it would be good to be able to use the remaining unused buttons. And why not, since the state of the socket can't be retrieved, to intercept and store the current state.
Maybe there is a way to squeeze yet another protocol?
It turned out that it was quite easy to do without much interference to the existing two decoding pipelines!
Meet the 433Mhz receiver
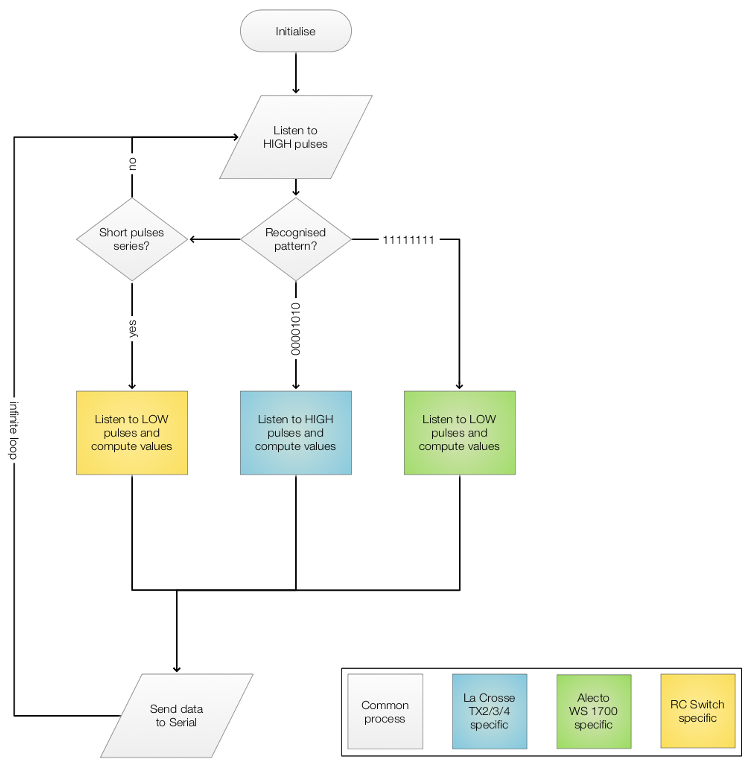
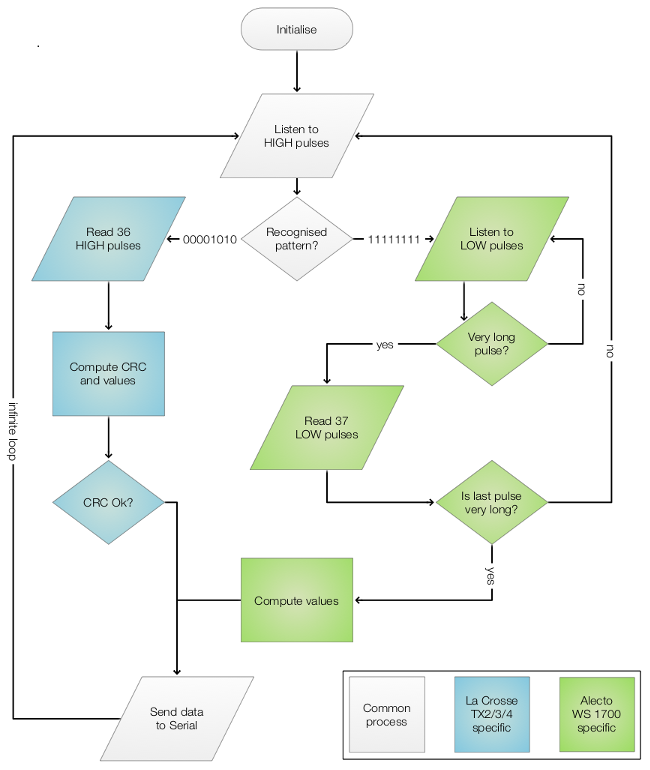
Basically, the signal from the remote will appear as a series of High pulses which are shorter (~ 320µS & ~ 960µS) compared to the one from the sensors (~ 500µS/1300µS and 1900µS/3800µS). If a string of these specific pulses is detected, then we switch to the remote decoder.
The signal being sent at least 3 times from the remote, this mean that we can intercept the second or the third transmission. The transmission itself starts with a "very long" pulse (31 times the base pulse). The encoding is based on a tri-state system which basically means, since we can ignore the floating state, that every other bit must always be a 1. The data consists in the address part, the button part and the state (ON/OFF) repeated but inversed.
For example:
101011101011101010101110
can be decoded in (checking then removing all the odd bits):
001001000010
and interpreted as:
address (DIP switches): off-off-on-off-off
button: A
Action: On
Code
Since there is now a little bit more than Lacrosse sensor decoding, I renamed the project on GitHub to 433Mhz receiver...
Since I embraced the MQTT protocol, I added the conversion and now any touch on the remote control is translated into something like (to carry on with the example above):
Topic: cm/remote-00100/action/a
Payload: {"ts": 1451215192, "value": "on"}
The first part is complete. Hooking up a 433 Mhz emitter (remember this?) on the Raspberry Pi is easy but for both technical and whimsical reasons, I have something else in mind...
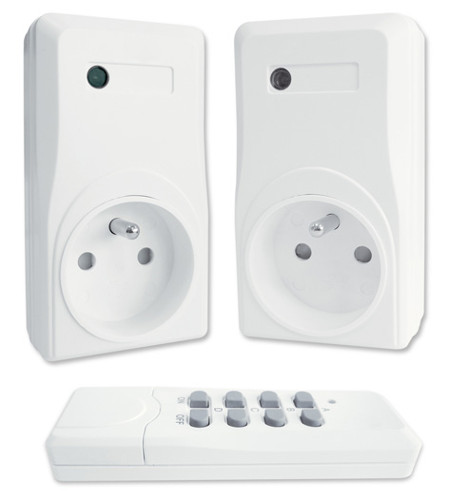
A few days ago, as I was in a nearby DIY store (looking for something I didn't find in the end), I came by the Electricity aisle and noticed cheap remote sockets. These are a not new thing, I owned some more than 25 years ago — so unstable there were switching on and off randomly — and in France at least, the Belgian company Chacon made a successful product (DI.O) with this kind if items.
One of the major issue with them is that they are without any feedback of the status like you could have on a modern "smart plug". Yet, where a Z-wave socket alone is at least 40€, here a pack of 2 sockets was less than 15€ including the remote and its battery. The "manual" includes a EC Declation of Confirmity so I assume there are safe to use. The power is limited to 1000W but for Christmas lights, this is not an issue!
Obviously, the idea was also the do the reverse engineering on the protocol and if possible try to emulate the remote itself like I did several times in the past. Turns out that this very model of remote is used in dozens of packs and the circuit inside is well known and even officially documented!
Protocol and Home Automation
A quick search show pages and pages on the subject. These one are now called "Smart Home" but were previously sold under the Phenix brand by IDK. Protocol seems virtually identical to the Elro Home Easy plugs.
The next question was: What is the best to integrate these elements in the existing installation? There are two main parts for this: controlling the sockets but also making the most of the remote (especially the two unused ON/OFF buttons).
As described last year, I own a La Crosse Weather Station to which I added several additional (TX2 & TX3) sensors.
Trouble is, as the technology is phased out in favor of a 868Mhz based one, these sensors are harder to come by and are also a bit pricey.
Chance
Unexpectedly, I noticed a news about a firmware update of the RFXtrx433E from RFXCom talking about a well known chinese online shop's version of a sensor. Indeed, I was able to become the owner of a "433MHz Wireless Weather Station Digital Thermometer Humidity Sensor" for the very lucky price of US$8.88 all included.
Protocol
These sensors are apparently compatible with the Alecto WS1700 ones. The protocol was decoded and published on the Pilight wiki and forums.
It looked simple enough so I decided to modify my Arduino/Digispark script in order to decode it as well.
Pulses
Yet there was a catch! La Crosse TX3 protocol uses a variation of pulses on the high level with timing on the low level being almost identical (and ignored by my decoder's implementation).
For the WS1700... it's the opposite! Hence only a succession of 37 identical 500µS pulses was the only thing seen.
Also, the signal finishes by a "very long" (~9200µS) Low and, as usual with this kind of device, the whole sequence is repeated several times.
If we detect at least 8 continous short high pulses, then we know it's not a TX3 sensor but probably a Alecto compatible one and therefore from now on only low pulses will be read.
The strategy is then to wait for very long pulse, read the full signal, checking the header (~1900µS ~3800µS ~1900µS ~3800µS), and at last validating with the last pulse which should be again a very long one.
The new algorithm is represented in the following flowchart:
Reporting
The Id, which is randomly generated when inserting new batteries -- same as TX3 -- is ignored... I will assume that nobody else has a compatible sensors around and use the channel number instead.
Channel (there is a physical switch to select it) is coded 00=CH1, 01=CH2, 02=CH3. This will be my sensor ID because it is fixed. But to avoid any clash, I add 1001 so CH1=1001, CH2=1002, CH3=1003.
Battery will be reported as OK or KO.
There is a small button at the back of the sensor to force the emission. Apart for tests, it is not that useful and we can ignore the bit reporting this.
Temperature is in 10th of degrees Celcius so value is divided by 10. Negative values are taken care of as well.
Humidity is straight out the signal received except if not read properly (0%).
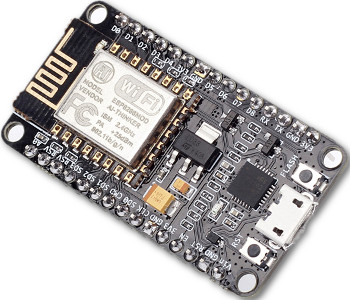
As noted before, the devkit comes with a USB connection and power regulator. Same principle as on the Arduino boards.
The version bought is the newest devkit 1.0 (AKA v2 on Seeedstudio).
OK... bizarre but a quick check with Google gives a workaround:
file.remove("user.lua")node.restart()
According to one post, there are two Lua files inside a new board: init.lua and user.lua.
These are used for factory testing purpose only. Now the message has become:
And for information purpose, the content of the "init.lua" file:
>file.open("init.lua","r")>print(file.read())--init.lua, something like thisprint("Will run user.lc/user.lua in 1000ms")tmr.alarm(0,1000,1,function()tmr.stop(0)locals,erriffile.open("user.lc")thenfile.close()s,err=pcall(function()dofile("user.lc")end)elses,err=pcall(function()dofile("user.lua")end)endifnotsthenprint(err)endend)>file.close()
So far so good...
Connecting to the Internet
Same procedure as last time:
Setting "Wifi Station" mode => OK
Registering SSID and password => OK
Obtening a IP address => OK
Connecting to an external website => variable
Connecting from a browser to the module => KO
For some reason, there is a incompatibility between most firmwares and my Wifi router. :-(
Time to try with a different/more recent firmware.
Flashing disaster
As we say in french "Never Two Without Three". So after the HM-12 and the ESP-201, something was bound to go awry!
Using the latest version of esptool, I uploaded a new firmware... flashing was reported as successful but the module couldn't even boot! And this was the case with all firmware I tried.
As as I discovered, this is because the devkit 1.0 is based on the ESP-12E board. The "E" letter is important as it means the flash is 4 MB (or 32Mb) instead of the 512 KB (2Mb) standard model. The mechanism address the flash seems different and it is essential to use specific parameters like:
I.e. using DIO for flash_mode (instead of QIO) and 32Mb for flash_size (instead of 2Mb).
Then, at least I could boot! But the filesystem (used by LUA) was destroyed and the list of files was returning strange data.
It took me long while to find a way clear it (obviously file.format() didn't work) but I, at last, managed it by running:
./esptool.pyerase_flash
That said, it is still impossible to open any file from LUA. There are a few comments about this problem on the Seeedstudio page, so I am not alone.
I actually wonder if the nodemcu builds are truly compatible with this new hardware!
EDIT (02/07/2015):
Many thanks to Johny Mattsson for his workaround to this issue and for taking the time to notify me. I am happy to report that the new esptool.py (on dev branch) now unlocks the filesystem. See pull-request note Workaround write-protected flash when using esptool.py to flash in DIO mode for more information.
New access point
I happened to have a spare (old) wifi router.
And with this new set-up, TCP connections were fine either as a client or as a server!!!!
How annoying (and unpractical as I don't really want to multiply routers). And also what a waste of time and energy.
Since all types of firmwares (AT, nodemcu, arduino's) are plagued by this problem, it might be link to the Espressif's SDK I presume. But I still can't pinpoint what exactly is happening and why some IPs are reachable while others are not.
At least, I could play with my two modules.
The story so far...
2 modules 'ESP-201' and devkit 1.0 (using an ESP-12E)
Can't use my main Wifi Router but works fine on another one (except with a very old original firmware for the ESP-201)
LUA Filesystem broken on the devkit 1.0 (haven't retried on the ESP-201) making the use of nodemcu very unpractical
Like this blogger, who seems to have quite a lot of experience on ESP8266 modules, I am now convinced that Arduino's ecosystem is the way to go, at least for now.